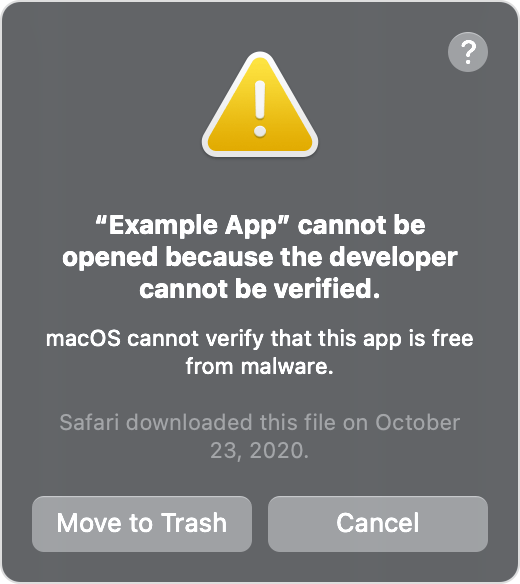
So you’ve created an amazing application for Mac OS and you’re ready to release it to the world. Your apps been tested, the .app has been built, and you’ve just sent it to your client to launch out into the world. Normally, this would be the part where you celebrate. In this case though, when your client downloads that little bundle of coded goodness and tries to launch it on their brand new machine, they’re presented with a giant scary pop-up that warns them that macOS cant verify your app and its probably infected with malware and some type of application syphilis. A symptom of you, most likely, not code signing & notarizing your macOS application for distribution.
But fear not!
In this post we’re going to walk you through the basics of code signing & notarizing your app. We’ll get your app signed, notarized, and slap on that shiny macOS stamp of approval so you can ad-hoc distribute your app to your hearts content.
So to start, to ensure that your app is secure and meets Apple’s standards for distribution, it’s important to code sign and notarize it. This is a basic process that lets you’re users know that you’ve gone through some due diligence, had apple give your a quick review, and that there’s probably nothing nasty inside. By following the below steps, you can avoid the above warning prompts and provide a seamless experience for your customers.
But wait, can we just jump in and notarize that bad boy? Unfortunately, no.
Before we dive into the code signing and notarization process, let’s first make sure you have a signing identity. A signing identity is a cryptographic signature that identifies you as the developer of the application and is usually obtained through a Developer ID certificate via your Apple Developer account.
To create a new Developer ID certificate, follow these steps:
- Go to Certificates
- Click the Plus sign to create a new Certificate
- Follow the prompts to create a private key and upload a Certificate Signing Request
- Download your Developer ID certificate
- Add it to your Keychain by clicking on the certificate. Within the Keychain, it will appear with a name like “Developer ID Application: XXX (YYY)”
OK, with that out of the way, now that you have your signing identity, it’s time to code sign and notarize your application. Open up a terminal and go to the folder containing the app you’d like to sign. Once there, lets sign your application using the following command:
codesign --deep --force --verify --verbose --timestamp --options runtime --entitlements "FILENAME.entitlements" --sign "Developer ID Application: Company Name LLC (APP-SHORT-NAME)" "FILENAME.app"Note: In the above code snippet, the portion shown as “Developer ID Application: Company Name LLC (ID)” should be the name of the certificate you installed above, obtained from you keychain.
If you were doing a basic signing, the above is all you’d need to do to have a signed application. The issue is that for more advanced purposes, Apple likes your app to be notarized as well. To do this, we’ll do the following.
First, create a zip file of your signed application using the following command:
ditto -c -k --sequesterRsrc --keepParent "FILENAME.app" "FILENAME.zip"We do this so that the app is easy to transport.
In order to submit your app for signing and notarization, you’ll need both the provider short name from your Apple Developer account and an app-specific password in a specific format.
To generate an app-specific password, you’ll need to have an Apple ID. For details on how to generate an app-specific password, see the guide How to generate an app-specific password. Once generated, the password should follow the format: xxxx-xxxx-xxxx-xxxx.
To get the short name of your application, which may be your team name, you can use your app-specific password with the following command. Type the below into your terminal and it should return info with your short name included.
xcrun /usr/local/itms/bin/iTMSTransporter -m provider -u "APPLE-USER-NAME" -p "PASSWORD"Now you’re ready to upload your zip file and pass in the required info using the following command. This will return a UID that we will use in the next step:
xcrun altool --notarize-app --username "APPLE-USER-NAME" --password "PASSWORD" --asc-provider "APP-SHORT-NAME" --primary-bundle-id "com.bundle.www" --file "FILENAME.zip"If you dont know what the primary bundle id of your app is, it can usually be found in your developer account. Its usually in the format com.bundle.www or something similar.
Once the app is uploaded for signing, the process can take up to an hour. To check the status of your app periodically, use the following command. You may need to run it a few times:
xcrun altool --notarization-info "UID-FROM-PRIOR-STEP" --username "APPLE-USER-NAME" --password "PASSWORD" --asc-provider "APP-SHORT-NAME"Once the process is complete, you’ll get a notification that the app was accepted. This may also show up in your email if you wait long enough. To continue, unzip the previously zipped file to get to the original .app file so you can run the following commands and confirm the notarization was successful:
spctl -a -v FILENAME.appFinally, with your notarization confirmed, staple the Notarization onto the app using the following command.
xcrun stapler staple FILENAME.appAnd thats it! Your app is now ready to use. If you’d like to take this one step further, you can create an installer for your application and repeat the above process to ensure the installer is signed as well. We might discuss this process in a future article.
Code signing and notarizing your Mac application is an important step in the development process. It helps to ensure that your app is secure and that it meets Apple’s standards for distribution. By following the steps outlined above and obtaining a signing identity, you can easily sign and notarize your app and make it ready for


Nice post.